
Update – March 29, 2023
This post continues to be a somewhat popular search engine result, getting about 8,000 views per year, so I have again updated the sample application code to the latest versions of the .NET and Angular frameworks (ver. 7 and ver. 15, respectively). Previous iterations of this tutorial used .NET Core 3.1, .NET 5, .NET 6 + Angular 10, 12, and 14. I have archived these on different branches in the repository. The examples below are now using .NET 7 and Angular 15, with Visual Studio 2022 and Visual Studio Code on Windows 11. The most up-to-date code can be found on the master branch.
Update – September 29, 2022
Tutorial and sample application code updated to .NET 6 and Angular 14.
Update – August 30, 2021
Since this post has become a popular search engine result, I have updated the tutorial and sample application code from .NET Core 3.1 and Angular 10 to .NET 5 and Angular 12.
Original Post – November 5, 2020
Some recent projects at work have had similar requirements: a user needs to upload a file containing some data, the application will read the file and process that data on the server, and then some sort of output file will be created which the user can then download. The simplest approach would be to add a button to my application’s UI which would allow the user to choose the input file they want to upload, send that file in the body of an HTTP POST request to an API endpoint in my app, process the data, and return the output file in the response body of the request. However, this was less than ideal as the data processing step could take several minutes, and the request has the potential to time out. To solve this timeout problem, I could implement a polling technique. The initial POST request to upload the file would immediately return with a 200 response when the file is received on the server, and the server would start to process the data. The client will periodically, say every 10 seconds, send a request to the server to ask “are you done yet?” If the data was still being processed, the server would reply “no.” If the data processing was done and the output file was ready to be downloaded, the server would reply “yes” and include the output file in the response body.
An additional requirement for this app was a progress indicator so that the user could receive feedback about how far along the data processing was. In the response of the “are you done yet?” polling requests, I could maybe include some data for the progress indicator, perhaps a percentage value for a progress bar. However, there are some additional things that would need to be taken into consideration here. If multiple users have uploaded a file and are polling the server for the status of their output, how does each client know which file is theirs when it asks the server “are you done yet?” This could potentially be solved by creating some kind of session id which is returned to the client when the file is uploaded, and the client could provide that session id in the polling request to the server. Another consideration is the delay in between polling requests. If the data processing completes immediately after the last polling request, the user would have to wait up to an additional 10 seconds to get the output. Ideally, once the data processing is complete on the server, we would want to the client to know right away so they can download the output file. Beyond the inconvenience to the user of having to wait an additional few seconds to get the output file, clients continually sending HTTP requests to the server adds an additional and unnecessary processing load. If a large number of users have uploaded files and are polling the server for the status of their file in very short intervals, this creates many new connections and could potentially have a non-insignificant performance impact on the server.
When I develop applications, I try to not reinvent the wheel whenever possible. The problems I identified above required a custom solution to resolve: updating a progress bar with polling, managing session id’s, setting a delay between polling requests in an attempt to balance the number of connections being made to the server and providing close to real time updates on the client. Instead of implementing something similar to what I described above, I chose a different solution for my applications: SignalR. Now included as part of the ASP.NET Core shared framework, SignalR allows an app to establish a full-duplex connection between a client and the server. This provides the ability for the client to send data to the server and the server to send data to the client, simultaneously. SignalR would solve the issues I discussed above: the client can send data to the server to be processed, and the server can send updates about the progress to the client at any time, eliminating the need for very long running HTTP requests, or the need for the client need to periodically poll the server for a status. Once the SignalR connection is established, it persists and the client and server can communicate in either direction at any time. SignalR also provides a connection id which can be used to uniquely identify the clients and manage how each can communicate with the server, or with other clients. Under the hood, SignalR uses a WebSocket connection. If a WebSocket connection is not available, SignalR will gracefully fall back to different connection types, but the developer does not need to worry about this and/or change anything about their code – the library does all the heavy lifting for you! So all that you need to do as a developer is establish a connection between the client and the server, and you’re able to leverage everything the library has to offer.
In this blog post, I will detail how to implement SignalR in a web application, which has a .NET 6 back end and an Angular 14 front end, from scratch. I will make the assumption that your local environment is already configured for .NET and Angular development. I have made the completed project available in this repository on GitHub: angular-signalr-demo. You can test the final product of this tutorial here as well: mfcallahan.github.io/angular-signalr-demo
Let’s get started! I like to use a decoupled architecture when developing applications, keeping the front end and back end separated, so I initialized a new empty repository named “angular-signalr-demo”, and in there I added a folder named “SignalrDemo.Web.” This folder will contain the Angular 14 application to be created later in this tutorial, and a second folder named “SignalrDemo.Server” will be added when we create a new project in Visual Studio:

The screenshot above shows the basic repository folder structure once complete. To get started, we will create a new, empty ASP.NET 6 Web application. Launch Visual Studio 2022, open the “Create a new project” window and select “ASP.NET Core Empty.”


We will name the app “SignalrDemo.Server” and it will be saved in a folder also named “SignalrDemo.Server.”

Click “Next”, and on the next screen, select “.NET 6 (Long-term support)”, leave Authentication type as “None”, and check “Configure for HTTPS.” Click “Create” to complete the new project:

The default empty ASP.NET app includes just the bare bones needed: a Program.cs file that will serve as the entry point to the application, and is where we will configure various aspects of the application, such as services and routing. First, we will add a “Hub” class. A hub is what SignalR uses to communicate between clients and servers, and is somewhat analogous to the Controller class of ASP.NET Web API. Inside the Hub class we can define methods which the client can call, much like a Controller method. However, because SignalR allows two-way (or “duplex”) communication between client and server, the hub can also define methods which exist on the client and can be called by the server.
Right click the Signalr.Server project, and create a folder called “Hubs.” Right click the folder and select “Add” > “Class…” and name the new class SignalrDemoHub.cs:


Copy the following code into the file we just created:
using Microsoft.AspNetCore.SignalR;

namespace SignalrDemo.Server.Hubs
{
    public class SignalrDemoHub : Hub
    {
        public void Hello()
        {
            Clients.Caller.DisplayMessage("Hello from the SignalrDemoHub!");
        }
    }
}
You should see an error on the line with Clients.Caller.DisplayMessage indicating “‘IClientProxy’ does not contain a definition for ‘DisplayMessage’ and no accessible extension method ‘DisplayMessage’ accepting a first argument of type ‘IClientProxy’ could be found.”

This is because the Hub method is attempting to call a method named DisplayMessage() on the client which invoked the SignalrDemoHub.Hello() method, but DisplayMessage() isn’t defined anywhere yet. To solve this, we can create an interface called ISignalrDemoHub and define DisplayMessage() there. Right click the Signalr.Server project, and create a folder called “Interfaces.” Right click the folder and select “Add” > “New Item…”, select “Interface” and name it ISignalrDemoHub.cs. Copy the following code into the file:
namespace SignalrDemo.Server.Interfaces
{
    public interface ISignalrDemoHub
    {
        Task DisplayMessage(string message);
    }
}
This interface can be passed as a type parameter to the Hub class from which our SignalrDemoHub class inherits. Change this line in SignalrDemoHub.cs:
public class SignalrDemoHub : Hub
To this:
public class SignalrDemoHub : Hub<ISignalrDemoHub>
The error should now be resolved because our SignalrDemoHub class now knows that the client should implement a method called DisplayMessage(). But since we only created the interface, we still need to actually implement that method on the client. Before we do that, there are two final things to do in our server side code. We need to allow CORS, as the server application will be running on a different URL than the Angular application, and we need to add a SignalR service to the service collection on app startup. Open file Program.cs, and replace its entire contents with the following – this retains the default boilerplate code and adds what is needed for CORS and SignalR to work:
using SignalrDemo.Server.Hubs;

var builder = WebApplication.CreateBuilder(args);

var policyName = "defaultCorsPolicy";
builder.Services.AddCors(options =>
{
    options.AddPolicy(policyName, builder =>
    {
        builder.WithOrigins("https://localhost:4200") // the Angular app url
            .AllowAnyMethod()
            .AllowAnyHeader()
            .AllowCredentials();
    });
});

builder.Services.AddSignalR();

var app = builder.Build();

if (app.Environment.IsDevelopment())
{
    app.UseDeveloperExceptionPage();
}

app.UseCors(policyName);
app.MapHub<SignalrDemoHub>("/signalrdemohub");
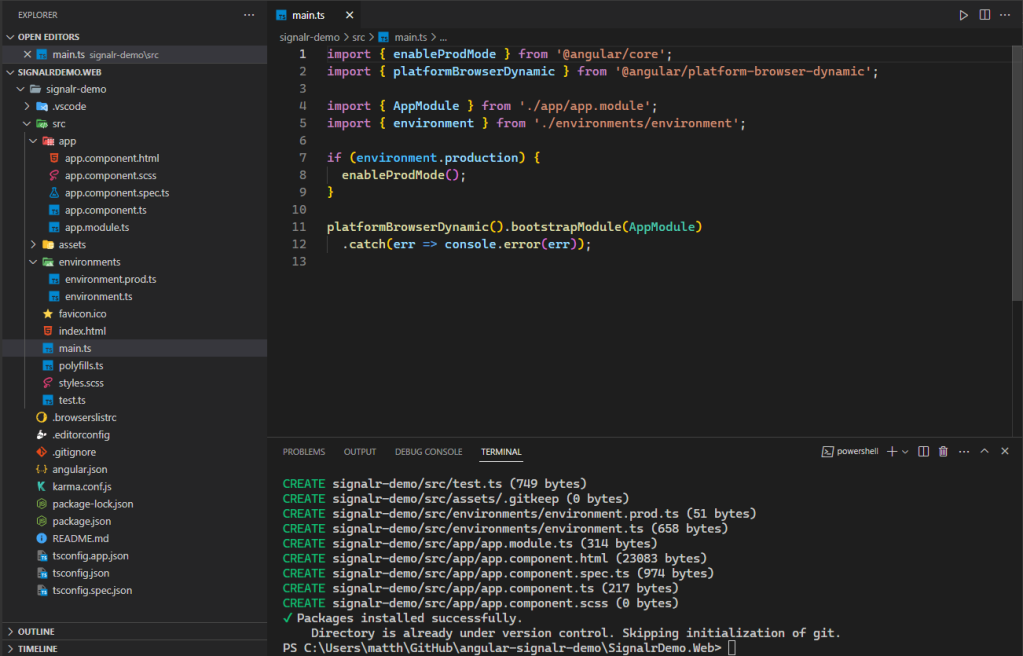
That is it for now on the server side code. We are ready to begin building the front end of our app. Inside the “SignalrDemo.Web” folder, use the ng new Angular CLI command and specify the name to create a new, empty Angular application: ng new signalr-demo. I chose not to add Angular routing since this will be a very simple application for demonstration purposes (this can always be added later), and I chose to use SCSS stylesheets:

The Angular CLI will install all the necessary packages and will scaffold out the folder and file structure necessary for an Angular workspace. Once that command completes, you should see all the files that have been added:
You can run ng serve and see the default app running on http://localhost:4200:

Next, we need to install the @microsoft/signalr npm package with command npm i @microsoft/signalr. Also install the SignalR types: npm i @types/signalr.

When installation of those packages completes, we will create a SignalrHubService class. This class will encapsulate the client side behavior of SignalR, including establishing a connection between the client and the server, exposing methods which will call the server side Hub methods to the rest of the Angular application, and defining methods to be executed on the client which can be called from the server. Use the ng generate command to create our new service: ng g service Signalr. This will create two new files in the “app” folder, signalr.service.ts and signalr.service.spec.ts:

Inside the signalr.service.ts file, SignalR needs to be imported, and two properties need to be added, hubUrl and connection. An async method called initiateSignalrConnection() is also needed. It is to be called on app startup, establishing the SignalR connection to our server before the Angular application load completes, and preventing app load if the SignalR Hub connection fails. Copy the following code to the SignalrService class, replacing its entire contents – the value of hubUrl is set both in “launchSettings.json” (for the port number), and in Program.cs (for the url path):
import { Injectable } from '@angular/core';
import * as signalR from '@microsoft/signalr';

@Injectable({
  providedIn: 'root'
})
export class SignalrService {
  hubUrl: string;
  connection: any;

  constructor() {
    this.hubUrl = 'https://localhost:7199/signalrdemohub';
  }

  public async initiateSignalrConnection(): Promise<void> {
    try {
      this.connection = new signalR.HubConnectionBuilder()
        .withUrl(this.hubUrl)
        .withAutomaticReconnect()
        .build();

      await this.connection.start({ withCredentials: false });

      console.log(`SignalR connection success! connectionId: ${this.connection.connectionId}`);
    }
    catch (error) {
      console.log(`SignalR connection error: ${error}`);
    }
  }
}
For now, we will simply log to the console a message indicating a success or failure for the SignalR connection attempt. When the browser loads the front end of our application, we want to establish the connection to the server right away. This is often useful if you want to send app configuration or other data which is necessary to properly render UI components. To do this, we can use the Angular APP_INITIALIZER injection token, providing it in our AppModule class and specifying the initiateSignalrConnection() method to be called before app initialization is complete. If the application is unable to successfully establish a SignalR connection, it will not load. Open the app.module.ts file, and update the providers property of the @NgModule() decorator with the following:
providers: [
  SignalrService,
  {
    provide: APP_INITIALIZER,
    useFactory: (signalrService: SignalrService) => () => signalrService.initiateSignalrConnection(),
    deps: [SignalrService],
    multi: true,
  }
],
We will also need to update the imports in the AppModule class with APP_INITIALIZER and SignalrService; add the following lines to the top “app.modules.ts”
import { APP_INITIALIZER, NgModule } from '@angular/core';
import { SignalrService } from './signalr.service';
At this point, we’re now ready to fire up the app and make sure everything is working as expected so far! Back in the SignalrDemo.Server .NET app, right click the SignalrDemo.Server project, and select Properties > Debug > General and click “Open debug launch profiles UI.” Select “SignalrDemo.Server” project, uncheck “Launch browser,” and also note the App URLs set here for http and https:


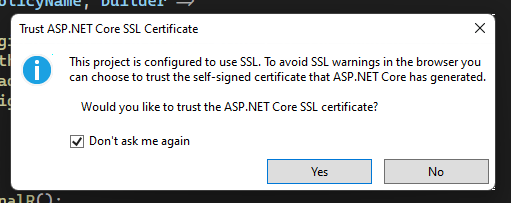
Start debugging the Signalr.Server app using the “https” profile. If prompted, trust the ASP.NET Core and IIS Express SSL certificates:

Start the Signalr.Web Angular app with ng serve --ssl true, and open https://localhost:4200 in your browser. Note the “-ssl true” flag when starting the app; this will prevent CORS errors when attempting to connect from an app being served from http (the default in Angular if not specified) to a server using https. In the console you should see a message like “SignalR connection success! connectionId: K8BdqNLhfubrzKaWZTmX9Xg”. The value of the connectionId will change each time the page loads and establishes a new connection.

In previous versions of this tutorial, I had been using Chrome to test this app. However, as I was re-creating this project from scratch with .NET 7 and Angular 15, I was having issues configuring the SignalR connection; it appears that there was an issue with another websocket connection used by the Angular CLI and SignalR. I didn’t dig too deeply into this issue as I was able to resolve it by testing with Firefox. I feel that properly configuring a local SSL development environment is out of scope for this tutorial, so I will make the assumption that developers reading this psot will already have that configured, and if they do run into a similar issue, sufficient resources are available on how to resovle it.
So far so, good! We have our front end successfully establishing the SignalR connection to the back end, now we can start communicating in both directions, sending data back and forth between client and server. We already added a Hello()method to our Hub class, so let’s call that from the client. In our AppComponent class, we will need to add a few things: add a property named hubHelloMessage with type string to the class (to which a template element can be bound) , inject the SignalrService class into the AppComponent class via the constructor, and then implement the OnInit interface. Update the class with the following code:
import { Component, OnInit } from '@angular/core';
import { SignalrService } from './signalr.service';

@Component({
  selector: 'app-root',
  templateUrl: './app.component.html',
  styleUrls: ['./app.component.scss']
})
export class AppComponent implements OnInit {
  title = 'signalr-demo';
  hubHelloMessage?: string;

  constructor(public signalrService: SignalrService) {
    this.hubHelloMessage = '';
  }

  ngOnInit(): void { }
}
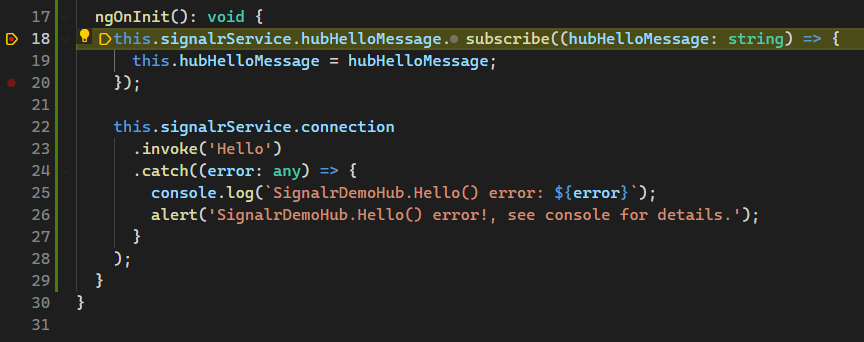
Inside the ngOnInit() method, we will call the Hub.Hello() method on the server. This will return a string which we can display on our page. Also inside the ngOnInit() method, we will be subscribing to an RxJs BehaviorSubject property that will be added to the SignalrService class. A BehaviorSubject is a type is a type of Observable that is useful for representing values over time, having a notion of the current value. It will store the latest value emitted to its consumers, and whenever a new Observer subscribes, it will immediately receive the current value. Update ngOnInit() with the following code:
ngOnInit(): void {
  this.signalrService.hubHelloMessage.subscribe((hubHelloMessage: string) => {
    this.hubHelloMessage = hubHelloMessage;
  });

  this.signalrService.connection
    .invoke('Hello')
    .catch((error: any) => {
      console.log(`SignalrDemoHub.Hello() error: ${error}`);
      alert('SignalrDemoHub.Hello() error!, see console for details.');
    }
  );
}
When this component is initialized, the SignalrDemoHub.Hello() method on the server will be invoked. Any error will be caught, logged to the console, and an alert() dialog box displayed to the user. Open the app.component.html file and remove all the existing markup from the default sample app, and replace it with the following so we can display the message we receive from the Hub method:
<h2>SignalR Demo</h2>
<p><b>hubHelloMessage:</b>{{ hubHelloMessage }}</p>
Now we just have one last thing to do before starting the app up again and testings. Remember that SignalrDemoHub.Hello() method is attempting to call a method named DisplayMessage() on the client, so we need to define that method. In the SignalrService class, add a property named hubHelloMessage with type BehaviorSubject<string>, and instantiate that property in the constructor:
import { Injectable } from '@angular/core';
import { BehaviorSubject } from 'rxjs';
import * as signalR from '@microsoft/signalr';

@Injectable({
  providedIn: 'root'
})
export class SignalrService {
  connection: any;
  hubHelloMessage: BehaviorSubject<string>;

  constructor() {
    this.hubHelloMessage = new BehaviorSubject<string>("");
  }
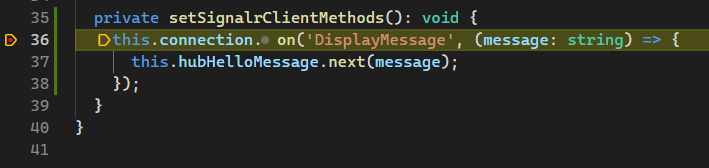
We will also add a private method called setSignalrClientMethods(). This will setup the client side methods that the server can call.:
private setSignalrClientMethods(): void {
  this.connection.on('DisplayMessage', (message: string) => {
    this.hubHelloMessage.next(message);
  });
}
When we call DisplayMessage() from the server, the hubHelloMessage BehaviorSubject will emit the string sent from the server. Method setSignalrClientMethods() will be called inside initiateSignalrConnection(), so update that method as well:
public async initiateSignalrConnection(): Promise<void> {
  try {
    this.connection = new signalR.HubConnectionBuilder()
      .withUrl(this.hubUrl)
      .withAutomaticReconnect()
      .build();

    await this.connection.start();
    this.setSignalrClientMethods();

    console.log(`SignalR connection success! connectionId: ${this.connection.connectionId}`);
  }
  catch (error) {
    console.log(`SignalR connection error: ${error}`);
  }
}
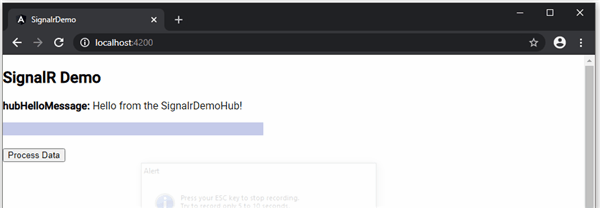
Now let’s test one more time. Start the Signalr.Server .NET app, and start the Signalr.Web Angular app. We should now see the message from the server displayed in the UI:

We can verify the flow of execution by adding a few breakpoints in the code. When we load the page in the browser, we can see the initiateSignalrConnection() method in the SignalrService class is called:

Then the setSignalrClientMethods() method is called:
Then the connectionId is logged to the console:

After we have established the connection and the app has been initialized, the ngOnInit() method in the AppComponent class is called, which will call the invoke() method of the SignalR connection. A string containing the name of the method on the server to execute is passed in:
Execution flow moves to the SignalrDemo.Server app, where the Hello() method in the SignalrDemoHub class is called, which in turn will call the DisplayMessage handler method inside the SignalrService class on the client, emitting the next value of the SignalrService.hubHelloMessgae property with the value of the string sent from the server:


At this point, the template element that is bound to AppComponent.hubHelloMessage is rendered with the string “Hello from the SignalrDemoHub!” We now have a working demonstration of a SignalR implementation in a .NET 6 + Angular 14 web application! A connection to the server is established, the client calls a method on the server, and the server calls a method on the client. Full-duplex, or two way, communication is now enabled within our app.
Displaying a short string message is obviously a very basic example and does not truly demonstrate the power of SignalR. Let’s add a more complex feature to the app – a progress indicator on the front end that will be updated from the server, in real time. This will simulate some data processing operation on the server which can take a little bit of time to complete. While the data processing is happening, we can periodically update the progress bar on the client, from the server.
To begin, let’s install the Angular Material library as it has some easy to use progress bar components. Install Angular Material with the following command: ng add @angular/material. I chose the “Purple/Green” theme, and selected “No” for setting up global typography styles, and included browser animations:

When the package installation completes, import the MatProgressBarModule in the AppModule class and add it to the imports property of the @NgModule decorator:
import { BrowserModule } from '@angular/platform-browser';
import { APP_INITIALIZER, NgModule } from '@angular/core';
import { MatProgressBarModule } from '@angular/material/progress-bar';
import { NoopAnimationsModule } from '@angular/platform-browser/animations';

import { AppComponent } from './app.component';
import { SignalrService } from './signalr.service';

@NgModule({
  declarations: [AppComponent],
  imports: [BrowserModule, MatProgressBarModule, NoopAnimationsModule],
  providers: [
    SignalrService,
    {
      provide: APP_INITIALIZER,
      useFactory: (signalrService: SignalrService) => () => signalrService.initiateSignalrConnection(),
      deps: [SignalrService],
      multi: true,
    },
  ],
  bootstrap: [AppComponent],
})

export class AppModule { }
In the AppComponent template, add a <mat-progress-bar> element, a <span> element to show a progress message, and a <button> element which will call a Hub method on the server to start the data processing simulation:
<p>
  <mat-progress-bar
    style="width: 400px; height: 20px; display: inline-block"
    mode="determinate"
    [value]="progressPercentage"
  >
  </mat-progress-bar>
  <span>{{ progressMessage }}</span>
</p>
<p>
  <button [disabled]="processing" (click)="processData()">Process Data</button>
</p>
We will again use BehaviorSubject properties to emit the progress bar percentage and progress message values received from the server, so add progressPercentage and progressMessage properties to the SignalrService class, with types BehaviorSubject<number> and BehaviorSubject<string>, respectively, and instantiate each in the constructor:
export class SignalrService {
  connection: any;
  hubUrl : string;
  hubHelloMessage: BehaviorSubject<string>;
  progressPercentage: BehaviorSubject<number>;
  progressMessage: BehaviorSubject<string>;

  constructor() {
    this.connection = null;
    this.hubUrl = 'https://localhost:7199/signalrdemohub';
    this.hubHelloMessage = new BehaviorSubject<string>("");
    this.progressPercentage = new BehaviorSubject<number>(0);
    this.progressMessage = new BehaviorSubject<string>("");
  }
The current progress bar value will be bound to a progressPercentage property in the AppComponent class and the progress message is bound to a progresssMessage property in the AppComponent class; add those new properties to the AppComponent class:
@Component({
  selector: 'app-root',
  templateUrl: './app.component.html',
  styleUrls: ['./app.component.scss'],
})
export class AppComponent implements OnInit {
  hubHelloMessage?: string;
  progressPercentage?: number;
  progressMessage?: string;
  processing?: boolean;
Again, we will need to subscribe to the BehaviorSubject properties we added to the SignalrService class, so add this to the ngOnInit() method in the AppComponent class:
this.signalrService.progressPercentage.subscribe((progressPercentage: number) => {
  this.progressPercentage = progressPercentage;
});

this.signalrService.progressMessage.subscribe((progressMessage: string) => {
  this.progressMessage = progressMessage;
});
We also need to implement the processData() method in the AppComponent class, to which our button is bound. Add the following code:
public processData(): void {
  this.processing = true;
  this.progressPercentage = 0;
  this.progressMessage = '';

  this.signalrService.connection
    .invoke('SimulateDataProcessing')
    .then(() => {
      this.processing = false;
    })
    .catch((error: any) => {
      console.log(`SignalrDemoHub.SimulateDataProcessing() error: ${error}`);
      alert('SignalrDemoHub.SimulateDataProcessing() error!, see console for details.');
    }
  );
}
This property added to the AppComponent class will be used to enable/disable the button:
processing: boolean;
Back in the SignalrDemo.Server app, add a new method to the SignalrDemoHub class:
public void SimulateDataProcessing()
{
  var stopwatch = new Stopwatch();
  stopwatch.Start();

  int progressPercentage = 0;
  var random = new Random();

  for (int i = 0; i < 10; i++)
  {
    int waitTimeMilliseconds = random.Next(100, 2500);
    Thread.Sleep(waitTimeMilliseconds);

    Clients.Caller.UpdateProgressBar(progressPercentage += 10);
  }

  stopwatch.Stop();

  Clients.Caller.DisplayProgressMessage($"Data processing complete, elapsed time: {stopwatch.Elapsed.TotalSeconds:0.0} seconds.");
}
This method will simulate a longer running data processing operation by iterating through a loop 10 times, waiting a random number of milliseconds (from 100 to 1500) in each iteration before updating the progress bar on the client. When the loop is done, we will update a message on the client indicating the processing is complete and display the total elapsed time. We also need to define a couple additional client side methods which the Hub can call, so update the ISignalrDemoHub interface with the following:
public interface ISignalrDemoHub
{
  Task DisplayMessage(string messgage);
  Task UpdateProgressBar(int percentage);
  Task DisplayProgressMessage(string message);
}
The last thing we need to do is implement the two new methods we just defined in the ISignalrDemoHub interface on the client. In the SignalrServce class on the client, update the setSignalrClientMethods() method with the following code:
private setSignalrClientMethods(): void {
  this.connection.on('DisplayMessage', (message: string) => {
    this.hubHelloMessage.next(message);
  });

  this.connection.on('UpdateProgressBar', (percentage: number) => {
    this.progressPercentage.next(percentage);
  });

  this.connection.on('DisplayProgressMessage', (message: string) => {
    this.progressMessage.next(message);
  });
}
We’re ready to test the app – start debugging on the SignalrDemo.Server .NET application, and start the SignalrDemo.Web Angular application. We should now see the following:

Click the “Process Data” button, and the SimulateDataProcessing() method on the Hub is called, updating the process bar.
I have published the completed working example here: mfcallahan.github.io/angular-signalr-demo
We’re barely scratching the surface of what can be done with real-time client-server communication in an application, but sometimes the hardest part is just getting started when trying a new tool/library. Chat rooms, data dashboards, and games are just a few more things which can greatly benefit from high frequency updates from the server and other clients. I hope this tutorial helped you get SignalR implemented in your .NET + Angular application. Feel free to comment here with any questions you may have!
Additional SignalR Resources:

Hi , i was trying your repo but when i was try web project (localhost:4200) on chrome , it doesn’t work. Why ?
LikeLiked by 2 people
Hi thanks for reading my post and commenting! Here’s a few things to double check: Is the SignalrDemo.Server.sln running? Are there any build errors if you run “ng build” in the SignalrDemo.Web folder? Also, did you restore all npm packages by running “npm install” in the in the SignalrDemo.Web folder after cloning the repository?
LikeLiked by 1 person
Actually i can’t any component on page …
LikeLiked by 1 person
Claramente hay muchos errores, verifica por favor antes de subir!
LikeLike
The complete application (.NET back end and Angular front end) should build without error. Are there any specific errors that you are receiving? Are there any missing or unresolved dependencies?
LikeLike
to successfully install SignalR I used: npm install @microsoft/signalr
LikeLike
great work!
Your blog always adds some knowledge. You have explained each point in a very detailed manner.
Thanks for sharing
LikeLiked by 1 person
hi this is a great resource – thank you
I am wondering if there is a way to continuously monitor the state of the SignalR connection
After the connection is made is there a way to check the connection like using this.connection.OnClose or check the connectionState perodically ?
LikeLiked by 1 person
Yes – there are various lifecycle events that help you monitor the connection status and take appropriate action. See this link for more information: https://docs.microsoft.com/en-us/aspnet/signalr/overview/guide-to-the-api/handling-connection-lifetime-events
LikeLike
Do you have an updated version of this angular code I get
npm ERR! While resolving: signalr-demo@0.0.0
npm ERR! Found: @angular-devkit/build-angular@12.2.3
npm ERR! node_modules/@angular-devkit/build-angular
npm ERR! dev @angular-devkit/build-angular@”~12.2.3″ from the root project
I am not great with Angular and frankly hate it because of all this type of Voodoo but my project is using it so I am stuck.
LikeLike
hmmm..can you try deleting the “node_modules” folder and running “npm install” again? I don’t have an updated version at this time, but I am planning on doing that at some point soon.
LikeLike
I have updated the post and the code in the Angular + SignalR sample repository to use the latest Angular 14 and .NET 6. Try the most up to date version of the code here; let me know if you’re still not able to get the app started and I may be able to help: https://github.com/mfcallahan/angular-signalr-demo
LikeLike
You’re referencing Microsoft.AspNetCore.SignalR.Core which has been deprecated. The correct package is now Microsoft.AspNet.SignalR.Core
Also, you’ve got a coulpe of places that you refer to “DisplayMessgae” which I believe is spelling mistake.
LikeLiked by 1 person
Thank you – I have updated the post, correcting the typo with “DisplayMessage,” and I have updated the sample code to use the SignalR namespace included in Microsoft.AspNetCore.App shared framework, per this version comparison table:
Differences between ASP.NET SignalR and ASP.NET Core SignalR
LikeLike
Hey…Can you please help me out on below mentioned error? How can I resolve these errors!!
Access to fetch at ‘https://localhost:7199/signalrdemohub/negotiate?negotiateVersion=1’ from origin ‘http://localhost:4200’ has been blocked by CORS policy: Response to preflight request doesn’t pass access control check: No ‘Access-Control-Allow-Origin’ header is present on the requested resource. If an opaque response serves your needs, set the request’s mode to ‘no-cors’ to fetch the resource with CORS disabled.
Failed to load resource: net::ERR_FAILED
Error: Failed to complete negotiation with the server: TypeError: Failed to fetch
Error: Failed to start the connection: Error: Failed to complete negotiation with the server: TypeError: Failed to fetch
SignalR connection error: Error: Failed to complete negotiation with the server: TypeError: Failed to fetch
Angular is running in development mode. Call enableProdMode() to enable production mode.
SignalrDemoHub.Hello() error: Error: Cannot send data if the connection is not in the ‘Connected’ State.
PLease help me out.
LikeLike
See my other comment – I experienced a similar error and was able to resolve it.
I have run into this error before, and I unfortunately did not document the fix nor do I remember the exact cause of the error.LikeLike
remove the .AllowAnyOrigin() from the CORS policy builder in .net
LikeLike
I updated the tutorial, and I ran into the same issue. In “Program.cs” I realized I had this line:
app.UseHttpsRedirection();
which was causing the error during negotiation, similar to what you described. Removing it (or only calling it for the prod environment) solved the errors for me, and I was able to successfully connect my local angular app and SignalR hub. Try pulling down the latest from the main branch on the repo and running the app too.
LikeLike
Cannot read properties of null (reading ‘invoke’)
LikeLike
In this pic code i writen
ngOnInit(): void {
this.signalrService.connection
.invoke(‘Hello’)
.catch((error: any) => {
console.log(
SignalrDemoHub.Hello() error: ${error.toString()});alert(‘SignalrDemoHub.Hello() error!, see console for details.’);
});
}
LikeLike
It seems like the Program.cs file from the server code needs an app.Run(); at the end. Also I have no launch profile called “http” or “https”, but the program seems to run okay by debugging the SignalrDemo.Server profile, I just needed to change the app url to ‘https://localhost:7199’ instead of the URL that was put there.
LikeLike
Hi,
Thanks for the introduction.
It seems like many of your links are broken because the project changed path on Github.
LikeLiked by 1 person
Thanks for letting me know! I have fixed the broken GitHub project links.
LikeLike